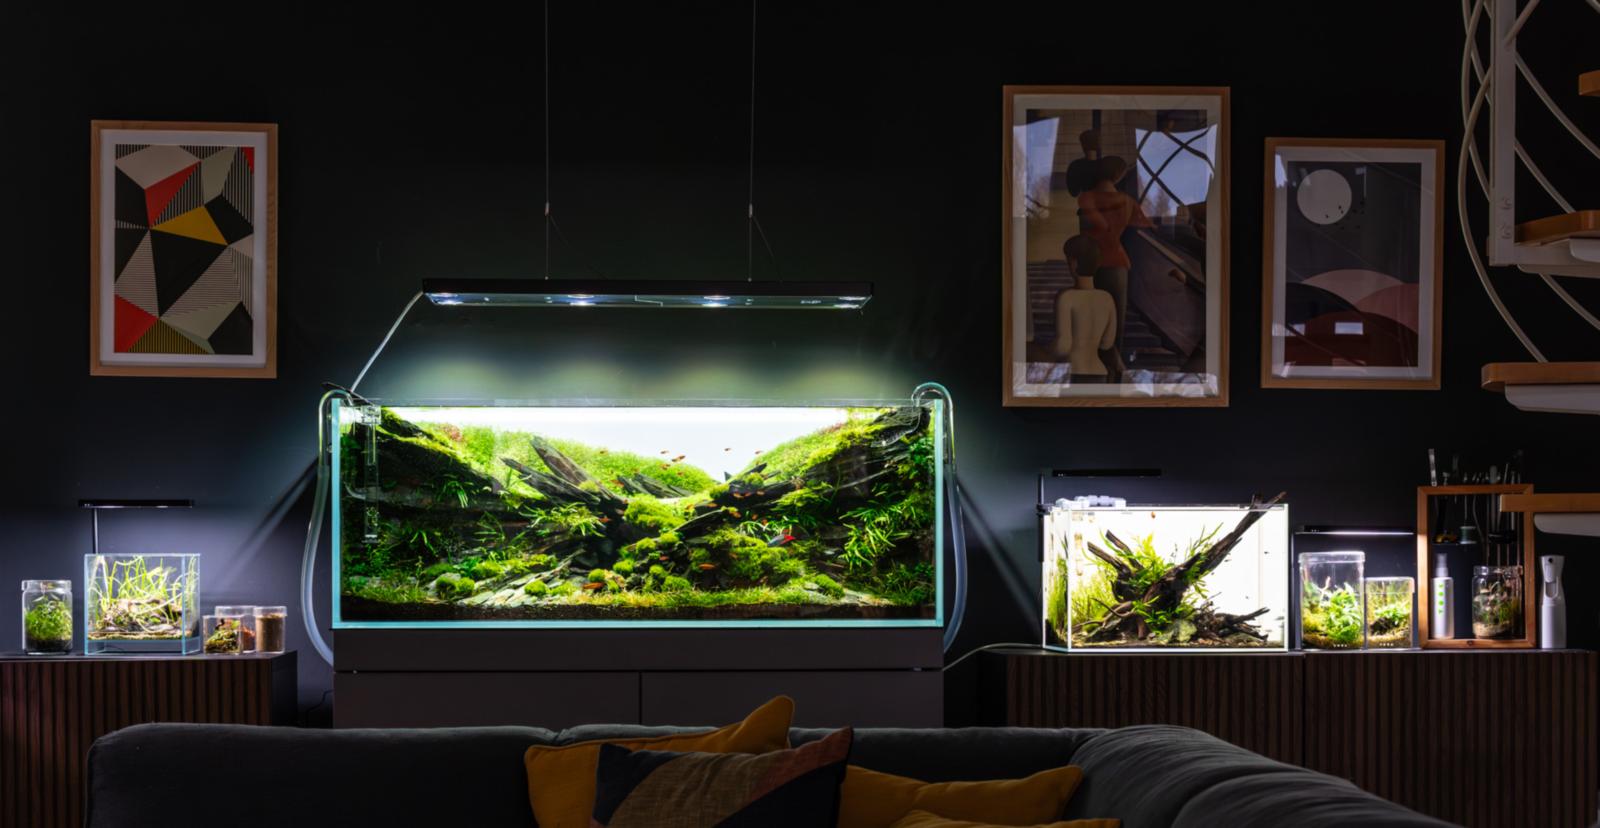
 Contest aquascape: from idea to winning layout
Introduction
My name is Fabian Beck, and in recent years I have taken part with great passion in various international aquascaping competitions, including the IAPLC (International Aquatic Plants Layout Contest), the EAPLC (European Aquatic Plant Layout Contest) and the KIAC (Korean International Aquascaping Contest). Along the way, I was able to celebrate some nice successes and gather valuable experience that has repeatedly reshaped my view of aquascaping.
The aquascape I am presenting to you in this article, however, is a very special project. It came about as part of a self-imposed 24-hour challenge, an idea born more out of a mix of curiosity, ambition and a dose of positive craziness. Within a single day, I designed the complete layout, chose the plants, organized the material I needed and finally planted the aquarium, with just 2.5 hours of sleep in between. Thanks to an express delivery from Aquasabi, the plants arrived in excellent quality, which allowed me to get started right away and work without compromising on the result.
In this article, I would like to take you through it step by step: from inspiration to the concept, the selection and arrangement of the hardscape, the planting, the choice of fish and necessary adjustments, all the way to the final finishing touches and the final photography. The article is aimed at everyone, from curious beginners to experienced scapers, but it helps if you have some basic experience with planted aquariums. With this knowledge, it can be a great help in mastering the entry into contest aquascaping.
1. Prerequisites
Before you take on a contest aquascape, you should be aware of what it requires. Competitions such as the IAPLC or the EAPLC call not only for creativity but also for technical know-how.
- Technology: A stable CO₂ supply, sufficiently strong lighting and reliable filtration are mandatory.
- Plant knowledge: You should know which plants grow how, which can be combined and which require patience.
- Hardscape selection: Stones and driftwood form the foundation of every layout. It is important to have a large amount of material of the same kind available, for example enough stones of one rock type or enough wood of a certain shape. Only this way can you develop coherent compositions and design the entire aquarium consistently, without the layout looking restless because of mixed materials. More choice here almost always means more design freedom.
- Time: The setup of my layout was done in 24 hours, but as is usual with contest scapes, the full effect only unfolds after weeks to months. Accordingly, I took the final photo much later, after the maturing phase, trimming and finishing touches.
- Photography: Since judging is based exclusively on images, the photo at the end is just as important as the layout itself.
My starting conditions
For my 24-hour challenge, I chose an aquarium measuring 120 × 50 × 45 cm, a size that offers enough room for an expressive layout but is still easy to handle.
Based on the requirements described in the previous chapter, I chose gray-brown slate as the hardscape. I had this stone available in sufficient quantity, and it convinced me with its elongated, linear shape, which made it ideal for creating a dynamic yet natural-looking layout.
2. Finding inspiration
Every layout begins with an idea. For me, nature is the most important source of inspiration: rock formations in the mountains, forests with their interplay of light and shadow, or flowing streams.
For this project, I deliberately browsed various websites where you can find past layouts. I also drew inspiration from nature photos and fantasy landscapes. What finally stuck with me most were the great layouts by Katsuki Tanaka: their linear, clear arrangement and precise composition fascinated me, and they fit perfectly with the elongated shapes of the slate I was working with.
It is important not to confuse inspiration with copying. A good aquascape transfers the mood of a landscape into the aquarium without rebuilding it one to one.
3. Concept
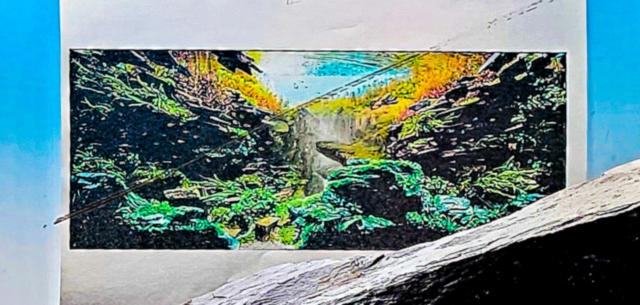
Composition sketch – gradient via masks/feather; photo of the printout (original lost).
The concept is the bridge between inspiration and execution. This is where you decide what character the layout should have. For my 24-hour challenge, it was clear that I needed a plan that could be executed in a structured way and would keep maturing in its effect over the grow-in phase.
- Hardscape planning: Stones and driftwood are the skeleton of the layout. I followed the golden ratio to set a natural focal point.
- Layout style: Dramatic and dynamic, yet still balanced – that is how it was supposed to look.
- "Two worlds" idea: At about half the tank height, I deliberately set a break in the planting to create two different zones – denser, low-growing vegetation with strong structure below, lighter, airy textures above. The transition is guided by lines of the hardscape, negative space and subtle contrasts in color and leaf shape, so that a design unity emerges despite the contrast.
To visualize the concept, I put together various images into a collage in Photoshop. Using layer masks and the workflow "Select → Modify → Feather", I let the images blend softly into each other at the desired places. This creates a seamless gradient that produces a coherent overall picture of the concept, ideal as a template for the subsequent execution and as orientation during the grow-in phase.
4. Plant selection
The choice of plants is decisive for harmony and impact, and it should be made so that the layout gains depth over weeks and months.
- Foreground: Carpeting plants for a closed picture after the grow-in phase.
- Midground: Structure-forming species that support the flow of lines and the staggering of depth.
- Background: Stem plants that build volume and become denser with regular trimming.
- Accents: Deliberately placed contrasts in color or leaf shape that develop stably over time.
My tip: It is better to use fewer species and combine them deliberately; predictable growth forms and tolerance of trimming matter more for a mature contest layout than short-term effects.
5. Hardscape design
The hardscape is the foundation – this is where it is decided whether a layout radiates tension or calm.
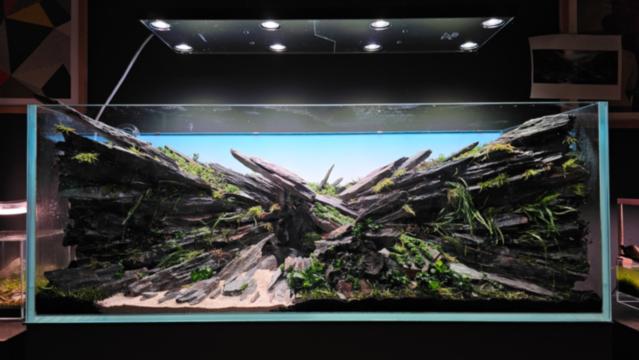
I worked with stones that set a clear direction while creating natural dynamics. Small stones support the large ones, and the substrate rises toward the back to create depth.
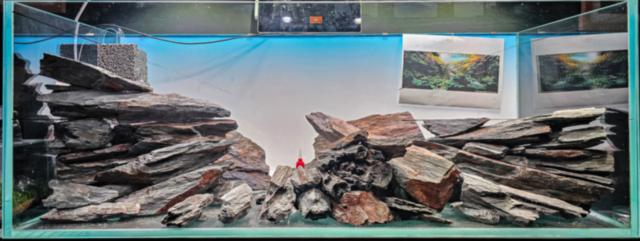
Because of the visual effect during the ongoing build, I decided to deviate slightly from the original plan. The direct comparison clearly showed that an alternative placement of the main stones strengthens the flow of lines and sets the focus more precisely.
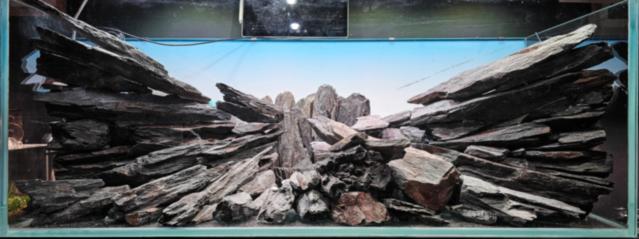
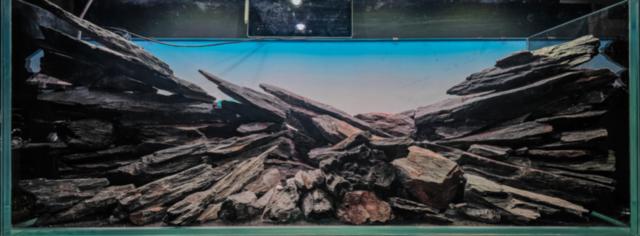
I especially found the design difficult in the upper area near the focal point: lines initially collided there, and the lightness upward was missing. That is why, a few days after planting, I adjusted the hardscape slightly – minimally different angles, a smaller counter piece, and the focal point noticeably breathed better. Yes, this formally breaks the 24-hour challenge, but a strong final result mattered more to me than clinging rigidly to the self-imposed rule.
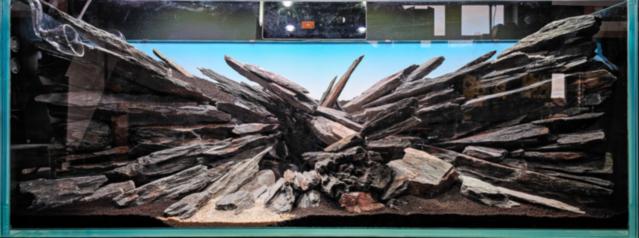
I created the concept for the adjustment in the same way as the original concept.
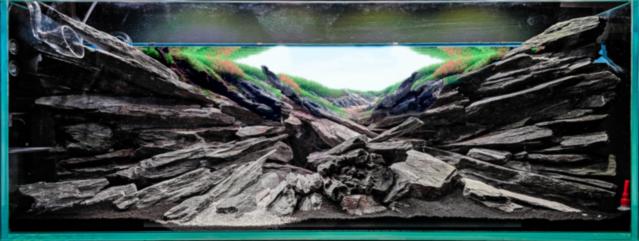
Important: Even though every piece is placed deliberately, it has to look as if nature itself had a hand in it.
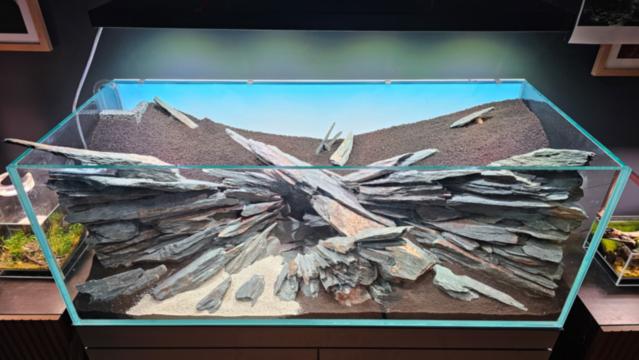
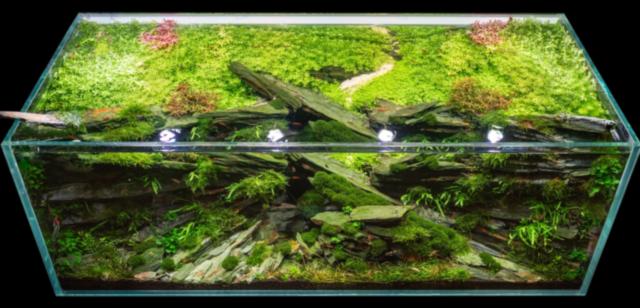
The structure looks impressive from an angle above as well:
6. Planting
The planting is done in a structured way, with an eye on healthy establishment:
- 1. Background – volume & height:
- Microcarpaea minima for fine, calm structures and a soft background texture.
- Hemianthus micranthemoides (HM) for lively, easily shaped bushes; it can be made much denser with regular trimming.
- Rotala species as vertical accents and for color nuances; staggered trimming creates depth and rhythm. - 2. Midground – flow of lines & transitions:
- Microsorum pteropus 'Trident' was used particularly extensively. Its finely slit growth picks up the linear shapes of the slate and reinforces the intended "two worlds" composition. Through targeted placement at the bend points of the hardscape, 'Trident' leads the eye from the foreground into the midground and frames the focal point.
- I used Anubias (small to medium-sized forms) and Bucephalandra (various varieties) to visually "seal" empty zones between the stone structure and the side glass of the aquarium – this creates clean edges without distracting gaps. - 3. Foreground – cohesion & calm:
- A mix of Helanthium tenellum 'Red' and Lilaeopsis brasiliensis: The fine leaves of Lilaeopsis bring a "meadow feel", while Helanthium sets subtle contrasts with reddish tones. Over time, the tufts grow together into a calm yet lively carpet.
Mosses for detail & concealment: To defuse problem spots and create more microstructure, I used Mini Christmas Moss (Vesicularia montagnei "Mini Christmas") and Riccardia chamedryfolia selectively – at break edges, glue points and as a fine texture layer on protruding hardscape edges.
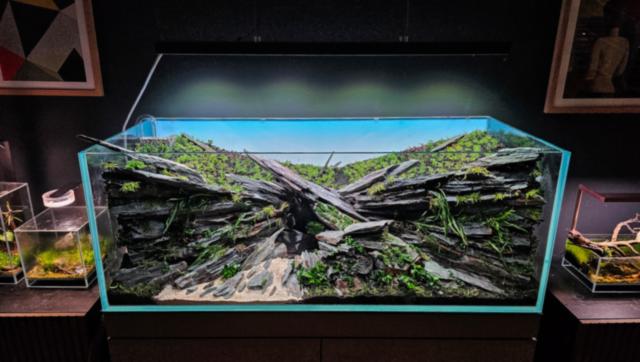
At the start, I go for a high planting density to prevent algae and to establish the desired shapes faster. Regular, moderate trimming steers the growth – over the weeks, the stands become denser and emphasize the hardscape.
Shortly after filling the aquarium with water, I took this photo, in which the water looked properly clear for the first time and the plants had already slowly started to establish.
7. Choosing the fish
When choosing the livestock, I tried out a lot at first, looking at schooling behavior, preferred swimming height and visual effect.
First, ember tetras (Hyphessobrycon amandae) and a pretty pair of Apistrogramma agassizii "Fire Red" moved in.
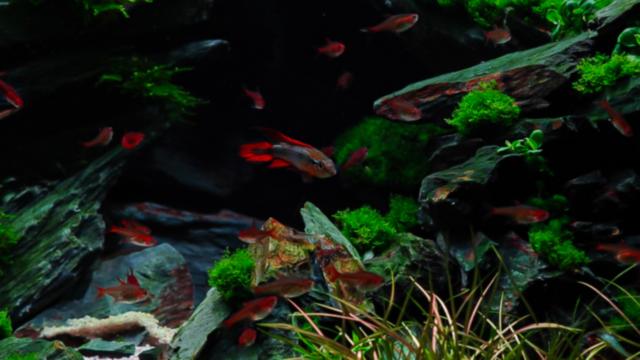
After that, I tested blue neon tetras (Paracheirodon simulans). However, neither species stayed reliably in the upper area – exactly where I wanted movement and "life" for the composition.
That is why I switched to a smaller group of eyespot rasboras – Rasbora dorsiocellata (from another aquarium). With its bright eye spot and calmer swimming style, this species brings exactly the accents in the middle/upper layer that I was looking for.
In hindsight, I would have liked to add a few more animals; the numbers were a little low to consistently "play" the whole area in the picture.
8. Adjustments
A strong contest layout comes from fine-tuning over several weeks:
- Closing gaps where plants do not take hold or develop more slowly.
- Shifting stones minimally to optimize the flow of lines.
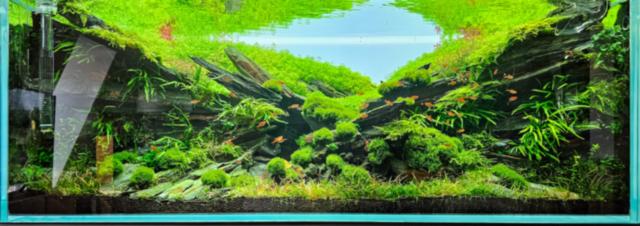
- I also decided to remove the gradient film on the backlight, which had a huge effect on the visual width.
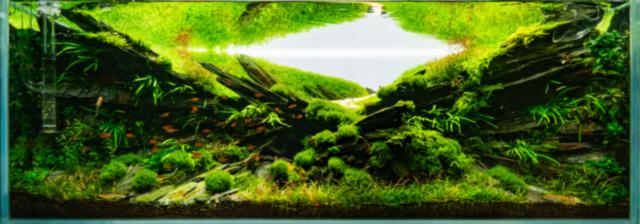
A lot of depth emerged; the visible planted area creates a clear separation and a difference from the foreground in front of the steep stone flanks. - Adjusting trimming rhythms so that all areas reach their peak at the time of photo submission.
Practical note: Some background plants intended as color accents – Rotala 'Orange' and Rotala 'Blood Red' – were crowded out by other species. I did not have the time to correct this consistently through more frequent trimming or replanting – a point I would prioritize differently in hindsight.
9. Care & finishing touches
During the maturing phase, consistency and precision are in the foreground:
- Plan trimming cycles so that the foreground and midground are maximally dense at the time of the photo shoot.
- Keep nutrient supply and CO₂ stable; make small adjustments gradually rather than all at once.
- Cleanliness: Keep glass, hardscape and leaves free of algae; perform regular water changes and vacuum detritus out of the substrate so that clarity and microbiology stay stable.
- Sharpen the flow of lines: Leaves that did not underline the direction of the hardscape were consistently trimmed back or removed – this keeps the main lines clearly readable and the focal point gains presence.
- Refine the focal point: I deliberately arranged individual tiny pebbles at the focal point with tweezers so that everything looks coherent and the effect of depth is supported to the maximum.
Honestly: I neglected the moss balls for too long – as a result, there is no perfect growth pattern here.
Shortly before taking the photo, last details are perfected – from removing individual leaves to aligning fine moss structures.
10. Photography
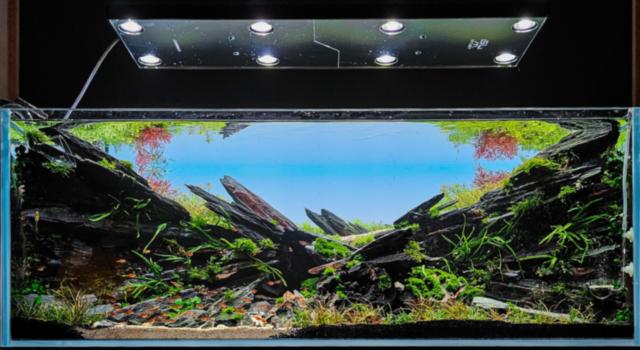
In the end, the photo decides – and that applies especially to contests. For my aquascape, I positioned the camera slightly frontal and a bit lower to emphasize depth.
- Darken the room: Switch off all lights in the room (including standby LEDs, and darken the windows). Wear dark clothing; if necessary, cover the camera brand logo with black tape to avoid reflections.
- Control surface movement: Use a hair dryer/fan to create a gentle current and thereby conceal visible glass edges or reflections. Vary the angle minimally until the edges disappear.
- Soften the backlight edge: When using a backlight, partially cover the rear pane, e.g. with cardboard, to eliminate hard transitions or a "bright edge".
- Post-processing: Subtle adjustments to brightness, contrast, clarity/sharpness – no manipulation of content.
Photography is not just documentation but the last creative step, which decides the impact of the entire project.
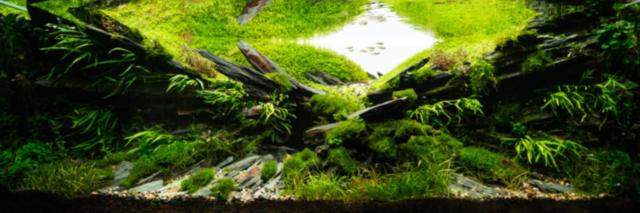
The result of the hard work: the Final Shot.
Competition results
With this aquarium, I took part in the KIAC and achieved a very good 25th place. Details on the jury's critique can be found at this link.
I also took 1st place with this layout at the Aquascaping Championship organized by Zoobox (Thomas Lönnig) and Aquaowner (Tobias Gawrisch).
Conclusion
A contest aquascape does not come about in a single day – even though in my case the setup and planting took place within 24 hours. The maturing phase with trimming, care and finishing touches is what makes the layout competition-ready in the first place and forms the basis for the final photo after several months. With a clear concept, suitable plant selection, a fitting choice of fish and consistent care, a strong competition aquarium grows from an idea.
A look back with some distance: Later on, I consciously revisited the scape once more and discovered various points I would approach differently today – a small but effective retouch here, a different trimming rhythm there, stricter priorities for color accents or the flow of lines in the upper area. A retrospective with some time in between separates gut feeling from result, uncovers blind spots and helps you improve in the long run – for me, it has now become a fixed part of every project.
Checklist: your next contest aquascape
I have also put together a compact checklist for you that you can use for your first or next contest tank:
Planning & goal setting
- Set competitions/deadlines (IAPLC, EAPLC, KIAC, etc.)
- Define theme/atmosphere (linear, wild, valley-like, "two worlds")
- Plan focal point & perspective (golden ratio, negative space)
- Rough sketch/collage (e.g. Photoshop, masks + "feather")
Technology & setup
- Calculate tank dimensions, light intensity, filter capacity, CO₂
- Plan substrate/height staggering (ramps for depth)
- Define water parameters & fertilization system (macro/micro, starter schedule)
Hardscape
- Get enough material of one type of stone/wood (lots of choice!)
- Place lead stones (angles/alignment), secure supports/wedges
- Check fine structure: small stones, pebbles, texture patches
Plant selection & planting plan
- Foreground: carpet/calm areas (e.g. Helanthium, Lilaeopsis)
- Midground: flow of lines (e.g. Microsorum 'Trident', Anubias/Buce)
- Background: volume & accents (HM, Microcarpaea, Rotala mix)
- Mosses for concealment & micro details (Mini Christmas, Riccardia)
- High starting density against algae; define the planting order
Livestock
- Choose a schooling species that matches the preferred swimming height
- Observe on a trial basis (swimming paths, visual effect), adjust if necessary
Cycling phase & care
- Constant CO₂, adjust nutrients and lighting periods
- Weekly water changes, vacuum the substrate, clean glass/stones
- Trimming plans: stagger the background, emphasize lines, remove troublemakers
- Refine the focal point (align pebbles with tweezers)
Finishing touches & photo
- Peak timing for the photo (all areas in top shape)
- Darken the room, wear dark clothing, tape over brand logos
- Use surface movement with hair dryer/fan to hide edges
- Cover the backlight edge if needed (cardboard)
- Develop RAW: subtle brightness/contrast/sharpness, no manipulation
Submission & retrospective
- Check competition rules, image sizes & file names
- Prepare short text/title/keywords
- After the contest: retrospective with some distance, note lessons learned